Honda CR-V fuse box diagrams: Complete detailed schemes for all generations
The Honda CR-V is a best-selling compact SUV known for its reliability. When an electrical component stops working, the cause is often a blown fuse. This guide provides the most complete fuse box diagrams for every generation, including exact locations, amperage, and protected circuits.
1st Generation CR-V (1997–2001) – RD1 / RD2 / RD3
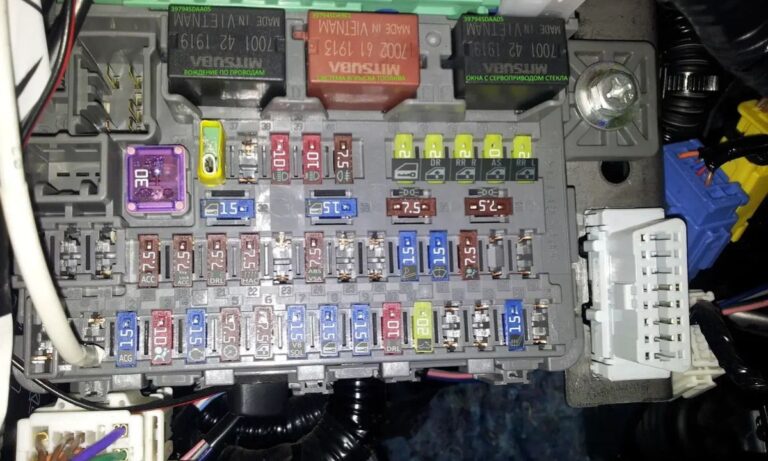
Interior Fuse Box Location:
Under the dashboard on the driver’s side (left kick panel, behind a small removable cover).
Complete Interior Fuse List:
- 1 — 15A — Fuel Pump, PGM-FI Main Relay, SRS Unit
- 2 — 10A — SRS Unit
- 3 — 10A — Rear Wiper Motor, Rear Washer Motor
- 4 — 10A — Right Headlight High Beam
- 5 — 10A — Left Headlight High Beam
- 6 — 10A — Rear Accessory Power Socket
- 7 — 15A — Small Lights (License Plate, Tail Lights, Instrument Panel Lights)
- 8 — 20A — Driver’s Power Window Motor
- 9 — 7.5A — Radio, Clock, Gauges
- 10 — 15A — Turn Signal/Hazard Relay, Turn Signal Lights
- 11 — 15A — Ignition Coils
- 12 — 20A — Front Wiper Motor, Front Washer Motor
- 13 — 10A — Back-up Lights, Shift Lock Solenoid
- 14 — 15A — Cigarette Lighter, Front Accessory Power Socket
- 15 — 7.5A — Meter Assembly, Gauges, Seat Belt Reminder
- 16 — 10A — A/C Compressor Clutch Relay (some models)
- 17 — 15A — Horn
- 18 — 10A — Right Headlight Low Beam
- 19 — 10A — Left Headlight Low Beam
- 20 — 20A — Power Door Locks (some models)
- 21 — 7.5A — Daytime Running Lights (Canada models)
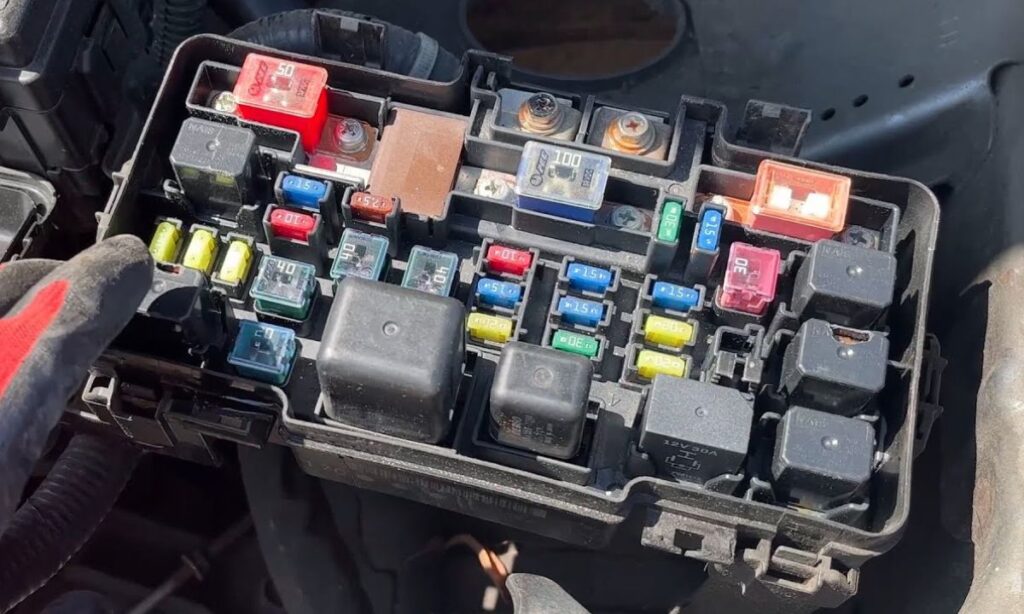
Under-Hood Fuse Box Location:
Engine compartment, on the driver’s side near the battery.
Complete Under-Hood Fuse List:
- 1 — 40A — Main Fuse (Battery to Fuse Boxes)
- 2 — 30A — ABS Motor (if equipped)
- 3 — 20A — Condenser Fan Motor
- 4 — 20A — Radiator Fan Motor
- 5 — 15A — Hazard Lights, Horn
- 6 — 15A — Headlight Low Beam (both sides)
- 7 — 15A — Headlight High Beam (both sides)
- 8 — 30A — Ignition Switch Main Feed
- 9 — 20A — A/C Compressor Clutch
- 10 — 40A — Blower Motor
- 11 — 15A — Alternator Sense
- 12 — 100A — Battery Main Fuse (some models)
2nd Generation CR-V (2002–2006) – RD4 to RD9
Interior Fuse Box Location:
Driver’s side under the dashboard (left kick panel).
Complete Interior Fuse List:
- 1 — 15A — Ignition Coils
- 2 — 10A — Front Accessory Power Socket
- 3 — 10A — Fog Lights (if equipped)
- 4 — 10A — Alternator, ECM/PCM, VSS, Cruise Control
- 5 — 7.5A — Multifunction Control Unit
- 6 — 15A — Cigarette Lighter
- 7 — 7.5A — Interior Lights, Keyless Entry
- 8 — 10A — Back-up Lights
- 9 — 15A — Rear Accessory Power Socket
- 10 — 20A — Power Window Main
- 11 — 7.5A — Turn Signals / Hazard
- 12 — 20A — Sunroof Motor (if equipped)
- 13 — 10A — Gauges, SRS
- 14 — 15A — Heated Rear Window Relay Feed
- 15 — 20A — Power Door Lock Control Unit
Under-Hood Fuse Box Location:
Engine compartment, driver’s side next to the battery.
Complete Under-Hood Fuse List:
- 1 — 20A — A/C Condenser Fan
- 2 — 15A — Parking Lights, Tail Lights, License Plate Lights
- 3 — 15A — Horn, Brake Lights
- 4 — 20A — Radiator Fan
- 5 — 15A — Hazard / Alarm System
- 6 — 15A — ECM/PCM Power, Fuel Injectors, Sensors
- 7 — 15A — ABS Control Unit, Horn
- 8 — 30A — ABS Pump Motor
- 9 — 20A — Heated Rear Window
- 10 — 40A — Blower Motor
- 11 — 30A — Headlight Main
- 12 — 50A — Ignition Switch Feed
- 19 — 100A — Battery Main Fuse
- 20 — 50A — Main Ignition Relay Feed
3rd Generation CR-V (2007–2011) – RE1 to RE7
Interior Fuse Box Location:
Driver’s side under the dashboard.
Complete Interior Fuse List:
- 1 — 7.5A — Electric Vacuum Pump (some models)
- 2 — 15A — Fuel Pump
- 3 — 10A — SRS
- 4 — 7.5A — Meter, Gauges
- 5 — 10A — Daytime Running Lights
- 6 — 15A — Heated Seats (if equipped)
- 7 — 10A — OPDS (Occupant Position Detection System)
- 8 — 7.5A — Interior Lights, Keyless
- 9 — 20A — Driver’s Power Window
- 10 — 20A — Passenger’s Power Window
- 11 — 20A — Moonroof
- 12 — 15A — Small Lights
- 13 — 20A — Door Locks
- 14 — 15A — Rear Accessory Socket
- 15 — 20A — Front Accessory Socket
- 16 — 10A — Audio / Navigation
- 17 — 7.5A — TPMS
- 18 — 20A — Headlight High Beam Main
Under-Hood Fuse Box Location:
Engine compartment, driver’s side near battery (primary box) + secondary box on some models.
Complete Under-Hood Fuse List:
- 1 — 100A or 125A — Main Battery Fuse
- 2 — 40A — ABS / VSA Motor
- 3 — 30A — Headlight Main
- 4 — 40A — Rear Defogger
- 5 — 40A — Blower Motor
- 6 — 30A — Radiator Fan
- 7 — 20A — A/C Condenser Fan
- 8 — 30A — ABS / VSA Control Unit
- 9 — 15A — Horn
- 10 — 15A — Hazard Lights
- 11 — 20A — Fuel Pump Relay Feed
- 12 — 40A — Ignition Switch Main Feed
4th Generation CR-V (2012–2016) – RM1 / RM3 / RM4
Interior Fuse Box Location:
Driver’s side under dashboard (left kick panel).
Complete Interior Fuse List:
- 1 — 10A — Back-up Lights
- 2 — 7.5A — Audio / Climate Control
- 3 — 15A — Cigarette Lighter / Front Accessory
- 4 — 20A — Power Windows Main
- 5 — 10A — SRS
- 6 — 7.5A — TPMS
- 7 — 15A — Heated Seats
- 8 — 20A — Driver Power Window
- 9 — 20A — Moonroof
- 10 — 15A — Door Locks
- 11 — 10A — Gauges / Information Display
- 12 — 20A — Fuel Pump
Under-Hood Fuse Box Location:
Engine compartment, near battery.
Complete Under-Hood Fuse List:
- 1 — 125A — Main Battery
- 2 — 50A — ABS / VSA Motor
- 3 — 40A — Blower Motor
- 4 — 30A — Headlight Main
- 5 — 40A — Rear Defogger
- 6 — 30A — Radiator Fan
- 7 — 20A — A/C Condenser Fan
- 8 — 30A — Starter
- 9 — 15A — Horn
- 10 — 20A — Fuel Injectors / ECM
5th Generation CR-V (2017–2022) – RW1 to RW6 (Gas & Hybrid)
Interior Fuse Box Location:
Under the dashboard on the driver’s side.
Complete Interior Fuse List:
- 1 — 10A — Back-up
- 2 — 7.5A — Audio / Climate
- 3 — 15A — Front Accessory Socket
- 4 — 20A — Power Windows
- 5 — 10A — SRS
- 6 — 7.5A — TPMS
- 7 — 15A — Heated Seats
- 8 — 20A — Driver Power Seat
- 9 — 20A — Fuel Pump
- 10 — 10A — Smart Entry / Keyless
- 11 — 15A — Rear Accessory Socket
Under-Hood Fuse Box Location:
Engine compartment, driver’s side near the battery.
Complete Under-Hood Fuse List:
- 1 — 150A — Main Battery Fuse
- 2 — 60A — ABS / VSA Pump
- 3 — 40A — Blower Motor
- 4 — 30A — Headlight Main
- 5 — 40A — Rear Defogger
- 6 — 30A — Radiator Fan
- 7 — 20A — A/C Condenser Fan
- 8 — 30A — Starter Motor
- 9 — 15A — Horn
- 10 — 20A — Fuel Pump Relay
- 11 — 70A — EPS (Electric Power Steering) on some models
Hybrid models add extra 30A–50A fuses for high-voltage battery cooling fan and electric motor system.
6th Generation CR-V (2023–2026) – RS3 / RS4 (Gas, Hybrid & Plug-in Hybrid)
Engine Compartment Fuse Box Location:
Under the hood, on the driver’s side near the battery.
Complete Engine Compartment Fuse List:
- 1 — 175A — Main Battery Fuse
- 2 — 40A — Body Control Module Feed
- 3 — 50A — ABS / VSA Motor
- 4 — 40A — Blower Motor
- 5 — 30A — Starter
- 6 — 40A — ABS Valve
- 7 — 60A — ABS Pump
- 8 — 30A — Headlight Low Beam
- 9 — 20A — Fuel Injectors
- 10 — 15A — Horn
- 11 — 30A — Radiator Fan
- 12 — 20A — A/C Condenser Fan
- 13 — 40A — Rear Defogger
- 14 — 30A — EPS Motor
- 15 — 20A — 12V Battery Charger (Hybrid models)
Interior Main Fuse Box Location:
Under the dashboard, driver’s side (left kick panel).
Complete Interior Main Fuse List:
- 1 — 10A — Driver Power Window
- 2 — 20A — Passenger Power Window
- 3 — 20A — Rear Power Windows
- 4 — 15A — Front Accessory Socket
- 5 — 10A — SRS
- 6 — 15A — Fuel Pump
- 7 — 7.5A — Smart Entry / Keyless Access
- 8 — 10A — Gauges / Multi-Information Display
- 9 — 20A — Door Lock Actuator
- 10 — 10A — Heated Mirrors
- 11 — 15A — Heated Seats
- 12 — 20A — Audio / Infotainment Unit
Interior Sub Fuse Box Location:
Under the dashboard (additional small panel near the driver’s footwell).
Complete Interior Sub Fuse List:
- 1 — 7.5A — IG1 Fuel Pump
- 2 — 5A — LAF Sensor
- 3 — 10A — IG1 Option
- 4 — 7.5A — Climate Control
- 5 — 5A — Rain Sensor
- 6 — 10A — Camera Module
- 7 — 10A — Heated Steering Wheel (if equipped)
These complete fuse diagrams cover virtually every electrical circuit across all six generations of the Honda CR-V. Keep this guide in your vehicle or bookmark it for quick reference. When replacing fuses, always use the correct amperage to avoid damage or fire risk. If a fuse blows repeatedly, have the circuit checked for a short by a qualified technician.